Before you start training your skills in Zennoposter you definitely should watch this video, which you see below, to check what you might do on your own. Let this video to inspire you! I hope this will be a great motivation to learn more and more. Remember that for Zennoposter nothing is impossible!
Zennoposter – automatic profiles registration on Facebook.
Data
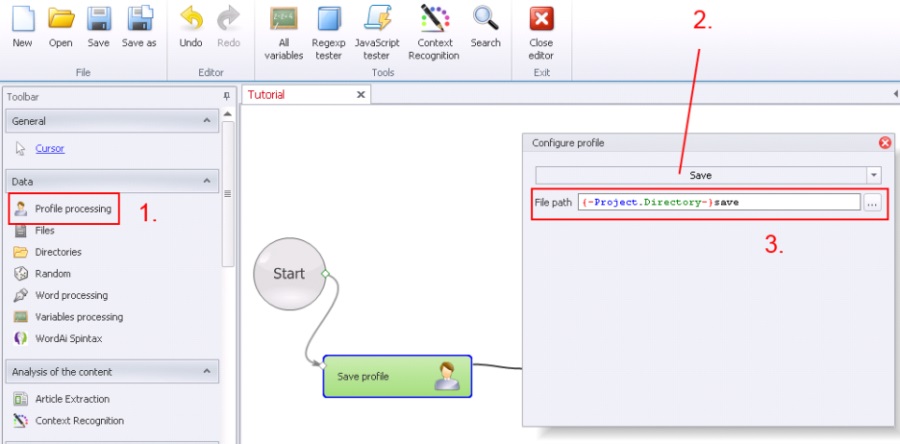
Profile –> Save
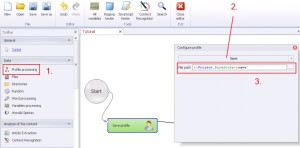
Saving profile data, which was generated during opening the project may be useful for future login to the account, after the registration to prove that is not fake. To be more effective data like proxy or useragent should be the same during using the account as when you registered the account.
1. Select ‚Profile processing’ from the left menu.
2. Select ‚Save’ from the drop-down menu.
3. Insert the path to save the file. In this case you don’t need to specify the extension, because it will be done automatically.
It is useful at the very beginning to get used to using {-Project.directory-} at every saving profile data or loading data. That is how we define the dynamic path of the project.
Profile –> Load
Loading a previously saved profile data.
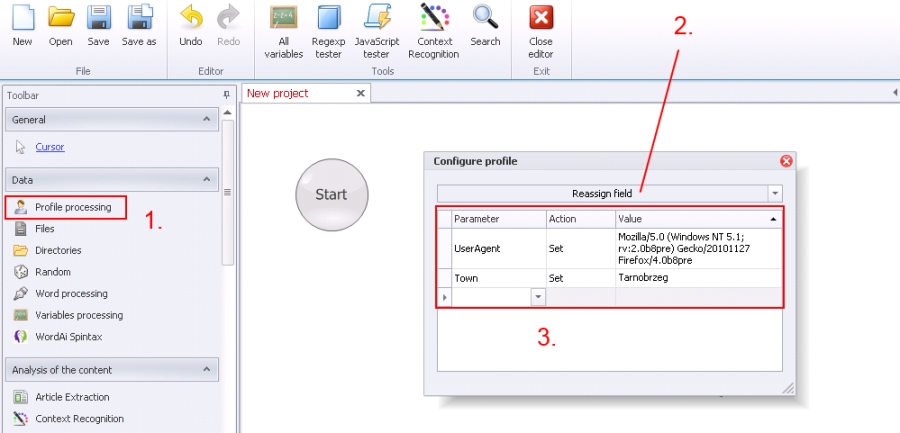
Profile –> Reassign field
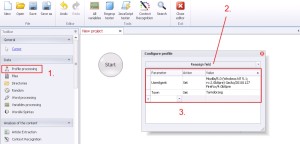
Sometimes you need to define your own profile data, like for example changing UserAgent (User Agent list you can download here) or specify the date of birth. You can assign data in ‚Profile –> Reassign field’.
1. Select ‚Profile processing’ from the left menu.
2. Select ‚Reassign field’ from the drop-down menu.
3. The table has 3 columns. In the first column ‚Parameter’ you can select profile parameter from the drop-down list, which would you like to define, next in ‚Action’ select ‚Set’ from the list. The last step is just to fill the column ‚Value’ with value.
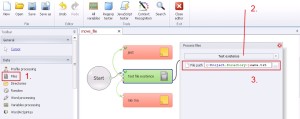
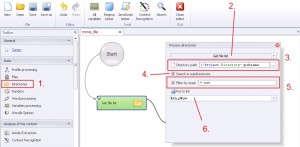
File –> Take text
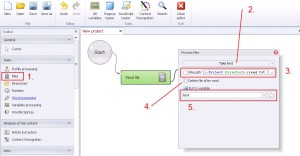
One of the most frequently used option, which reads the text file from the hard drive and save the value of the file to variable for later data processing.
1. Select ‚Files’ from the left menu.
2. Select ‚Take text’ from the drop-down menu.
3. Write file path.
4. If you want to delete the file after reading tick the box.
5. Insert the text value in variable. Select ‚New…’ from the drop-down list and define the variable name.

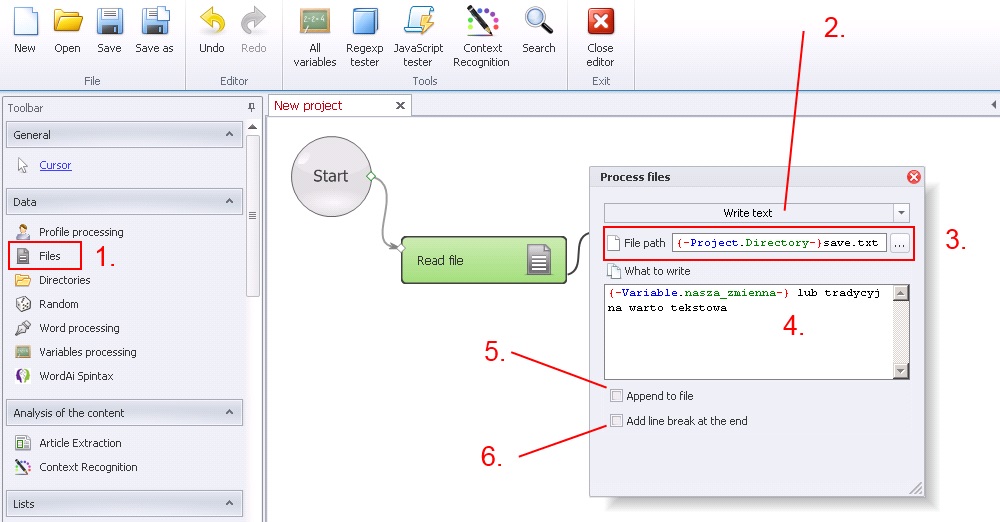
Files –> Write text
Save values to text file. To save files you can use variables as well as traditional text.
1. Select ‚Files’ from the left menu.
2. Select ‚Write text’ from the drop-down menu.
3. Write file path.
4. Write data to save. (It could be variable).
5. By ticking the box you will add value to the file. If the box will not be ticked, the file will be overwritten.
6. By ticking this option you will add empty row at the end of saving value. Functionality for cyclic saving separates data and in this case every another value will be add in the new row.
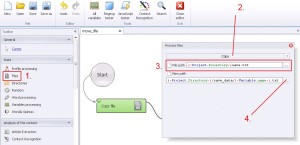
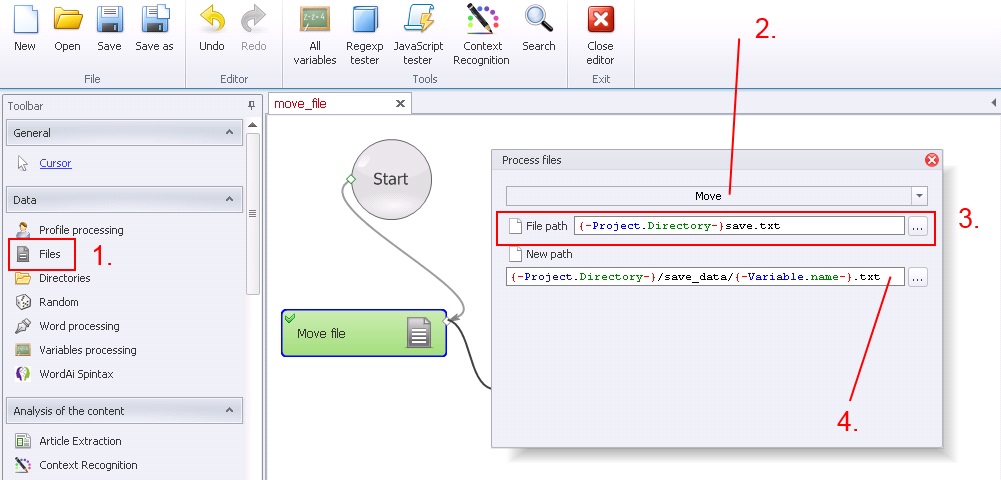
Files –> Move
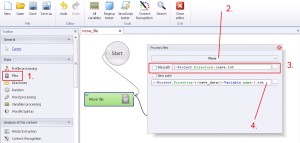
This option automatically move file from one place to another place on the hard drive. You can change here file location and in the same time file name and if you want to, you can also use variable to change file name.
1. Select ‚Files’ from the left menu.
2. Select ‚Move’ from the drop-down menu.
3. Write old file location, from where would you to move the file.
4. Write new file location. (and change name if you would like to).
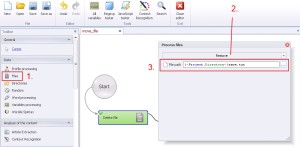
Files –> Test Existence
By using this option you have opportunity to check the file location.
1. Select ‚Files’ from the left menu.
2. Select ‚Test existence’ from the drop-down menu.
3. Write file location to verify.
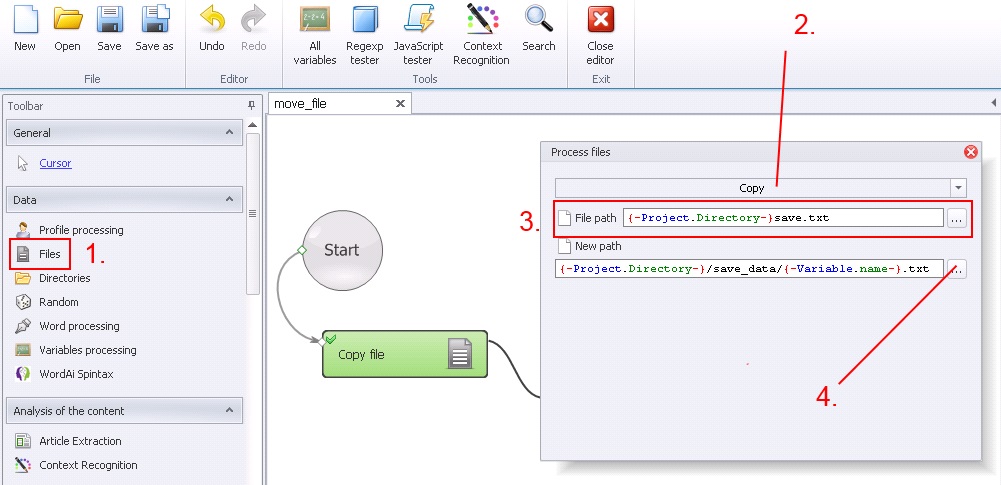
Files –> Copy
This function do copy/paste files on hard drive.
1. Select ‚Files’ from the left menu.
2. Select ‚Copy’ from the drop-down list.
3. Write where is the file, which would you like to copy.
4. Write new location, where would you like to save that copy.
Files –> Remove
This function remove file from hard drive.
1. Select ‚Files’ from the left menu.
2. Select ‚Remove’ from the drop-down menu.
3. Write where is the file, which would you like to remove.

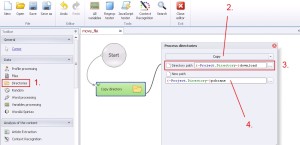
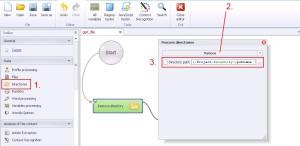
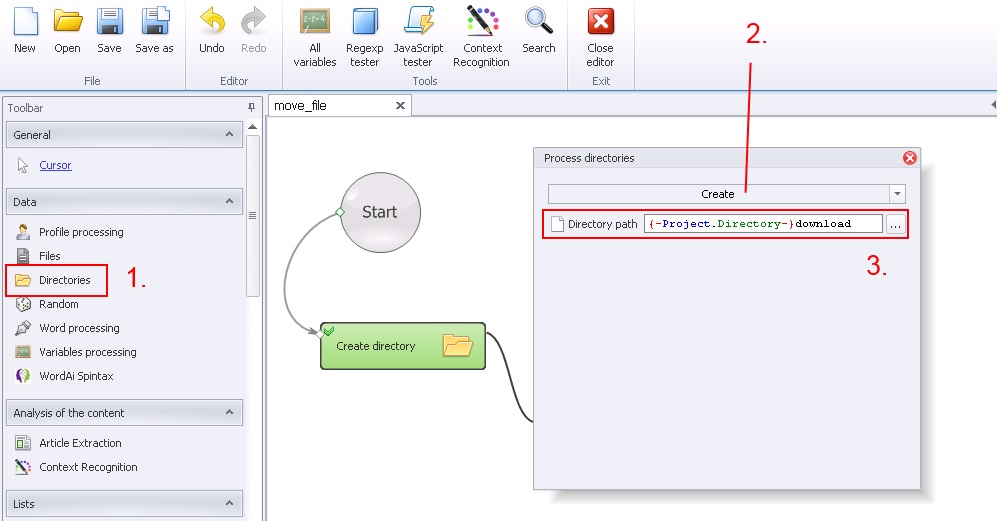
Directories –> Create
This function create the new directory on the hard drive.
1. Select ‚Directories’ from the left menu.
2. Select ‚Create’ from the drop-down menu.
3. Write where would you like to create new directory. (directory path)
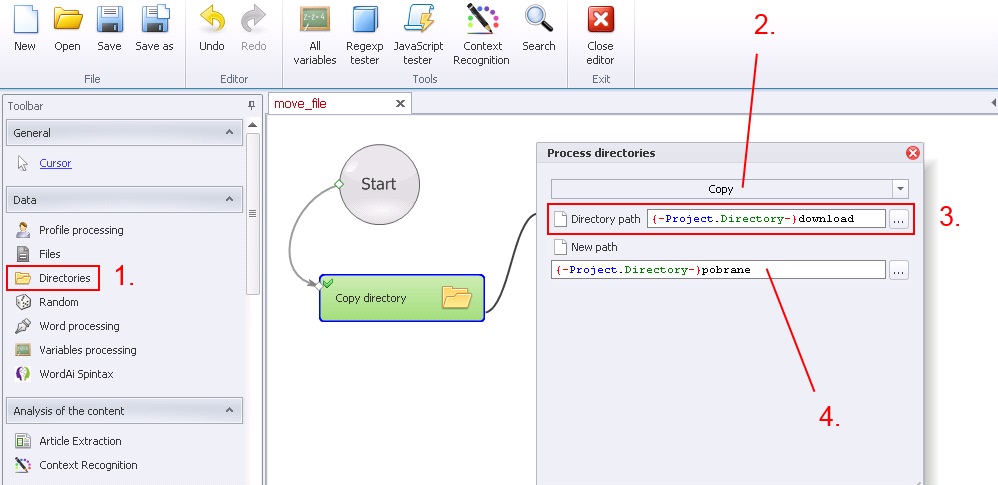
Directories –> Copy
This function copy all directories (with content) on the hard drive.
1. Select ‚Directories’ from the left menu.
2. Select ‚Copy’ from the drop-down menu.
3. Write where is the directory, which would you like to copy.
4. Write where would you like to paste this copy.

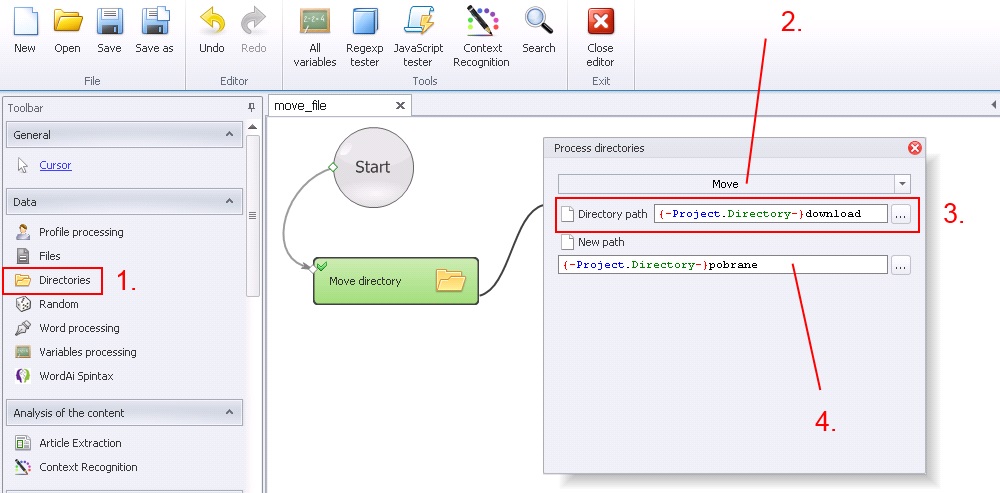
Directories –> Move
This function do move/paste all directories (with content) on the hard drive.
1. Select ‚Directories’ from the left menu.
2. Select ‚Move’ from the drop-down menu.
3. Write where is the directory which would you like to move (directory path).
4. Write where would you like to paste this directory (new path).
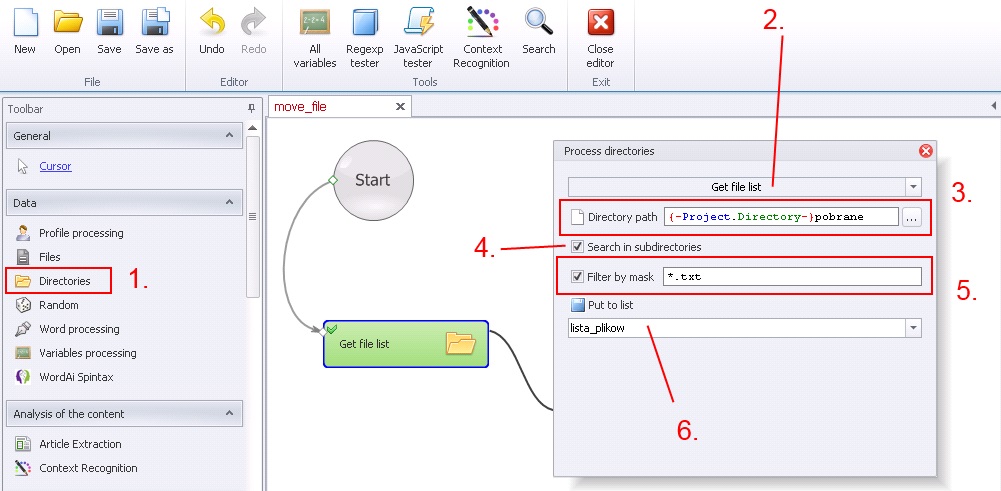
Directories –> Get file list
This function will get the list of files path from the defined directory. You can also filter names and files extensions during getting the list.
1. Select ‚Directories’ from the left menu.
2. Select ‚Get file list’ from the drop-down menu.
3. Insert the location of the file, which would you like to scan.
4. By ticking this option you will start nested search in every directories inside main directory.
5. Filtering through the mask will select specific files or groups of files by defined rule during searching. For example, if you want to find all files with .jpg extension, you need to use regex ‚*.jpg’ (without quotation). If you want to find all files starting with ‚a’ (no matter with which extension), you need to use regex ‚a*’ (without quotation).
6. Select the list, to which would you like to save data.
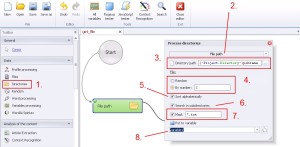
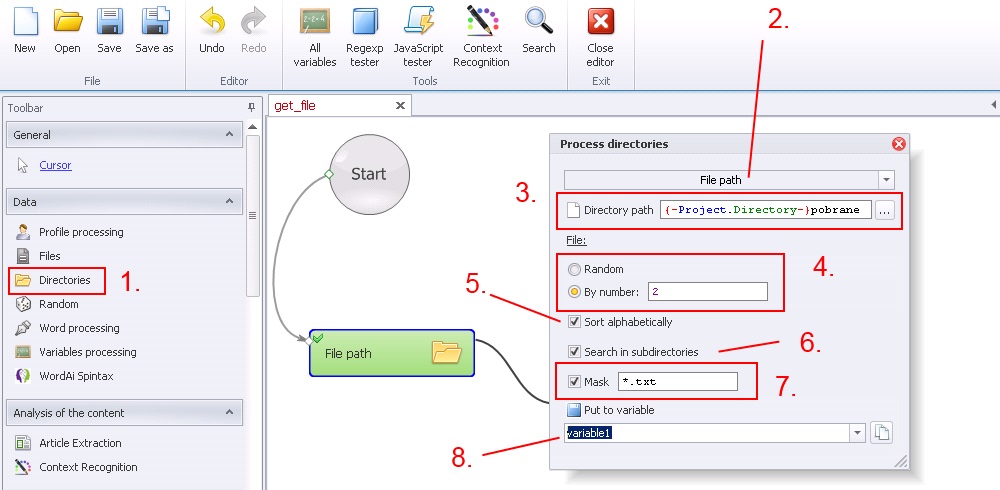
Directories –> File path
This function will bind the file path, which is located in defined directory to variable.
1. Select ‚Directories’ from the left menu.
2. Select ‚File path’ from the drop-down menu.
3. Insert the location of the directory, which would you like to scan.
4. Select by number or random selection mode.
5. Sort alphabetically. (useful during searching in subdirectories).
6. Search in subdirectories.
7. Search by using mask.
8. Create and save value to variable.
Directories –> Remove
This option remove all directory (with content).
1. Select ‚Directories’ from the left menu.
2. Select ‚Remove’ from the drop-down menu.
3. Write where is the directory, which would you like to remove.
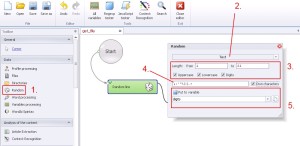
Random –> Text
Generating the text, which you can define by specify length range, size of letters, occurrence of digits and using own special characters.
1. Select ‚Random’ from the left menu.
2. Select ‚Text’ from the drop-down menu.
3. Define the length range of the generated characters string, size of letters (Uppercase/Lowercase) and occurrence of digits (Digits).
4. By ticking ‚Own characters’ you can define your own characters (special characters also). Ticking this option will stop generating default characters (even if they are ticked upper), so the function will use only your own characters. But the length range will still be the same like before.
5. Create and save generated string to variable.
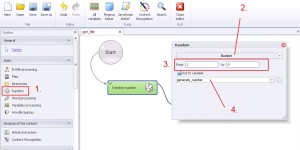
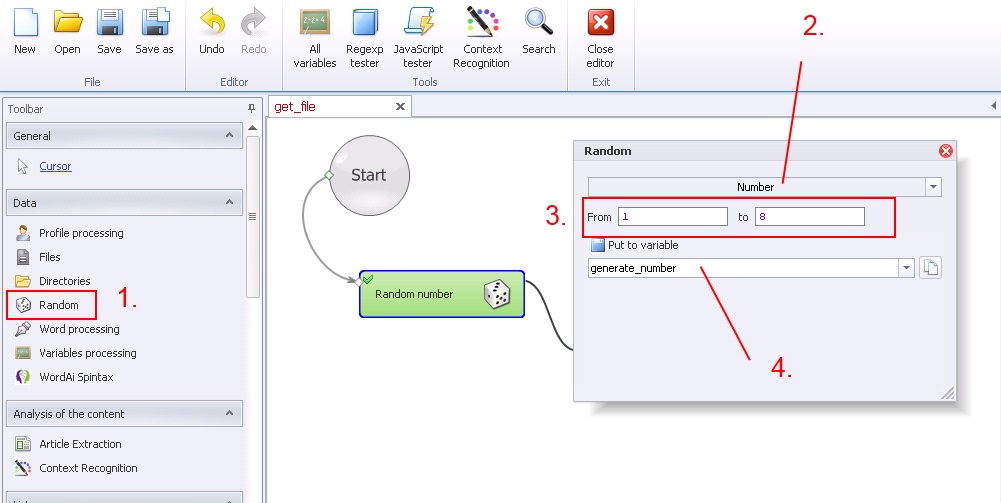
Random –> Number
Generated numerical string, in which you can define length range.
1. Select ‚Random’ from the left menu.
2. Select ‚Number’ from the drop-down menu.
3. Define length range of the generated numerical string.
4. Create and save generated string to variable.
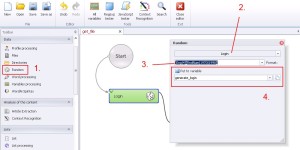
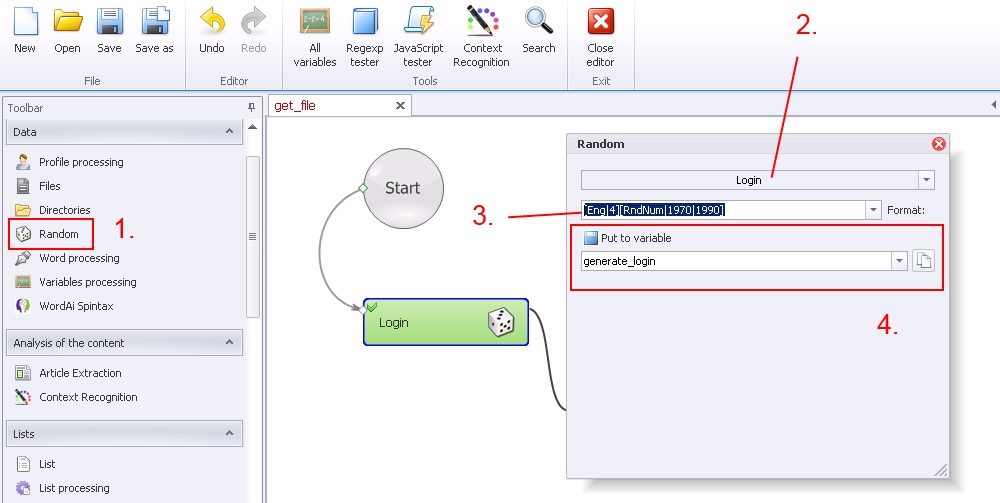
Random –> Login
During generating login you can also define the nationality, length and occurrence and define the numerical range.
1. Select ‚Random’ from the left menu.
2. Select ‚Login’ from the drop-down menu.
3. Define the nationality, length of the login and the numerical range.
For the example [Eng|4][RndNum|1970|1990] means:
— Eng – nationality
— 4 – the number of syllables
— RndNum – randomness
— 1970|1990 – numerical range in the range of 1970 to 1990
4. Create and save generated string to variable.

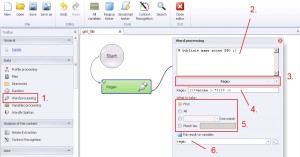
Word processing –> Replace
Advanced option of words (or strings) replacing in text. You can replace word/words in every combination, starting from first fit, ending on randomly from defined range of occurrences.
1. Select ‚Word processing’ from the left menu.
2. Insert text (or variable in which is that text), in with would you like to replace characters.
3. Select ‚Replace’ from the drop-down menu.
4. In ‚What to search’ insert characters, which would you like to replace. In ‚What to replace’ insert characters, which would you like to put instead. On the right side the text mode is already ticked, but if you need regular expression to your searching switch on ‚Regex’ mode.
5. First match.
6. All matches.
7. One match.
8. Only number of matches. (Match No.). This function will match advanced matches. Like for example ‚random2(0-3,5,6)’ will match 2 random matching in range from 1 to 4 and 6 and 7. You may have noticed, that is a delay in the match, cause in Zennoposter number 0 in matching is the first match, so the number 3 is the fourth, etc
Create and save replaced text to variable (put result to variable). All text will be saved, not only matches.
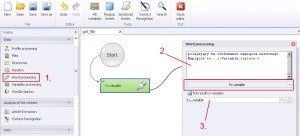
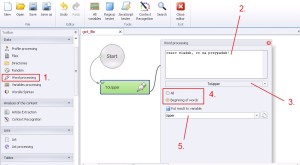
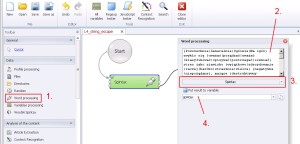
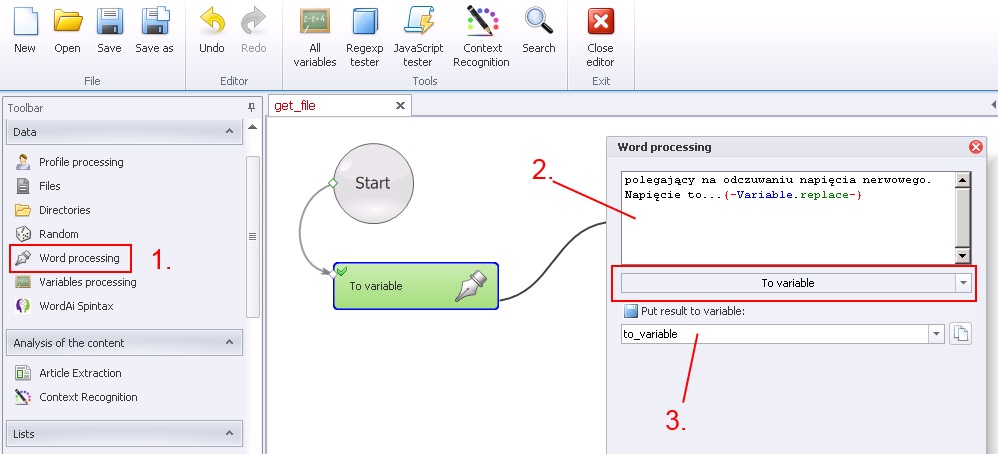
Word processing –> To variable
Saving text or variable to new variable. This function is really useful with connecting text with variable or with connecting several variables in one.
1. Select ‚Word processing’ from the left menu.
2. Insert text or/and variable.
3. Create and save to variable.
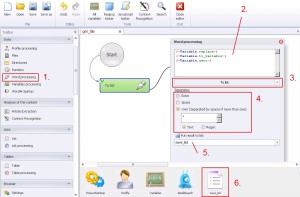
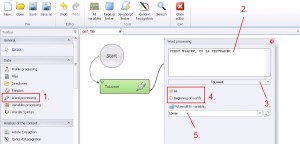
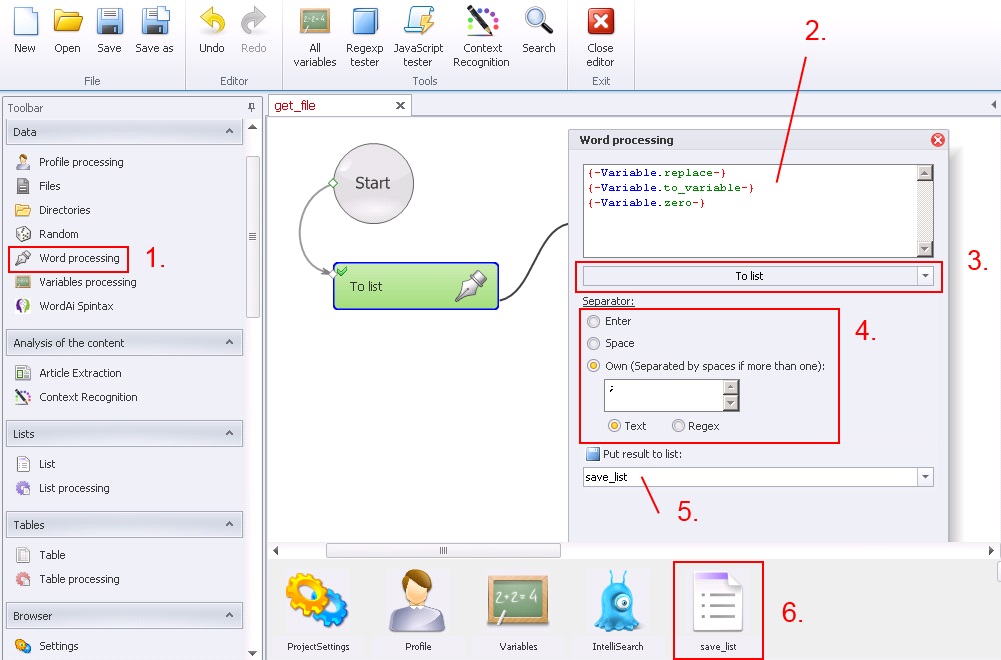
Word processing –> To list
Saving data to text file.
1. Select ‚Word processing’ from the left menu.
2. Insert data.
3. Select ‚To list’ from the drop-down menu.
4. Define separator, which will be separate data in cycling saving mode. You can select from ‚Enter’, ‚Space’ or in ‚Own’ you can define, your own separator. (both in text mode or regular expression).
6. Create the list.
5. Select the list to save from the drop-down menu.
Here above I intentionally changed the order with points 5 and 6, because first you need to create the list (if you haven’t got one already).
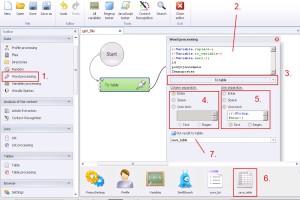
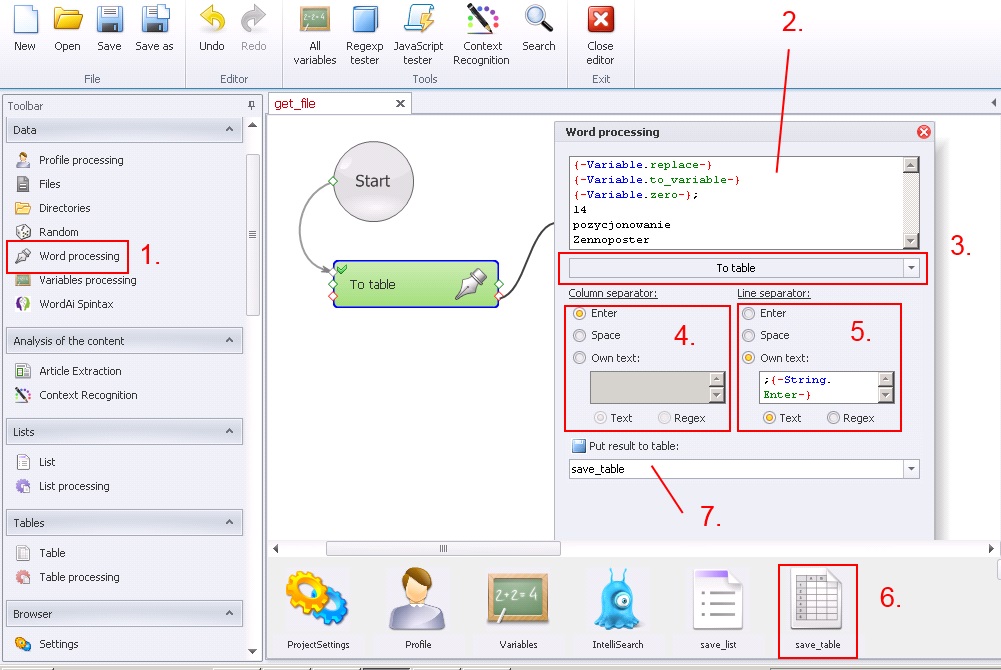
Word processing –> To Table
Saving data to the table. This function you should use very carefully, because it takes a lot of usage resource. If you really need to work on this files it will be better for you to work on lists in extension .txt.
1. Select ‚Word processing’ from the left menu.
2. Insert data.
3. Select ‚To table’ from the drop-down menu.
4. Select separator for columns.
5. Select separator for rows.
6. Create the table.
7. Save data to the table.
To better understanding separation in table case I will show you here below the result of above configuration, assuming that:
{-Variable.replace-} = variable replace
{-Variable.to_variable-} = variable to variable
{-Variable.zero-} = variable zero

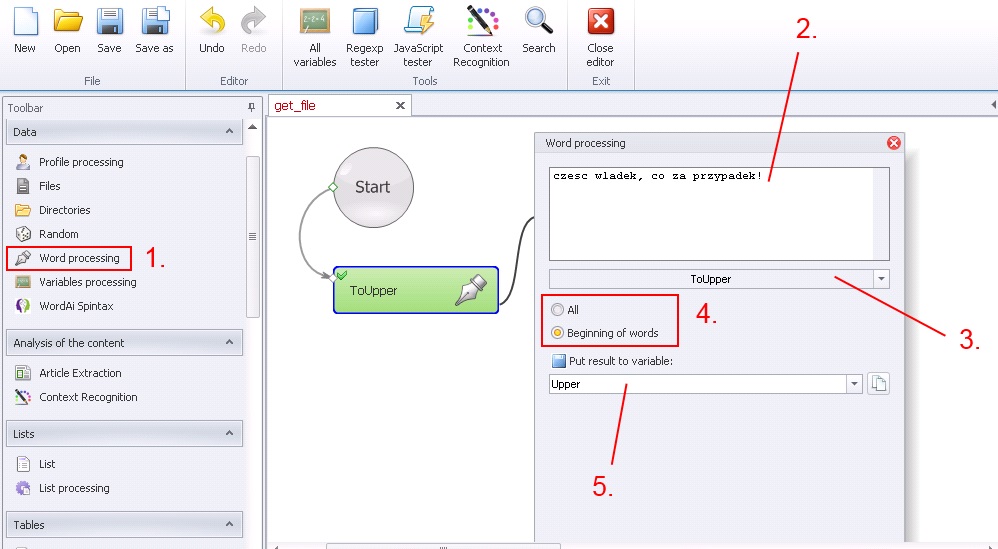
Word processing –> ToUpper
Replacing lowercase letters to uppercase. You have two options exchange: all or just beginning of words.
1. Select ‚Word processing’ from the left menu.
2. Insert data.
3. Select ‚ToUpper’ from the drop-down menu.
4. Replace all – ‚All’. Only beginning – ‚Beginning of words’.
5. Create and save to variable.
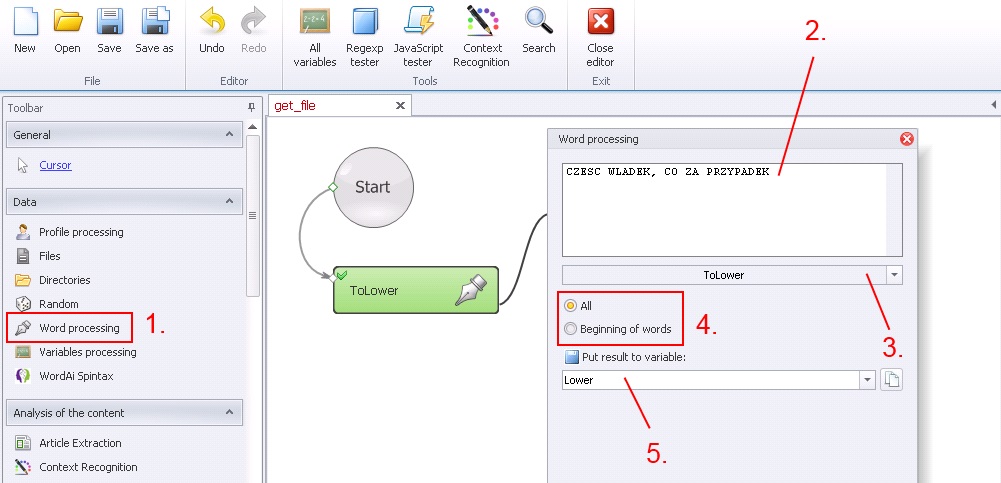
Word processing –> ToLower
Replacing uppercase letters to lowercase. You have two options exchange: all or just beginning of words.
1. Select ‚Word processing’ from the left menu.
2. Insert data.
3. Select ‚ToLower’ from the drop-down menu.
4. Replace all – ‚All’. Only beginning – ‚Beginning of words’.
5. Create and save to variable.
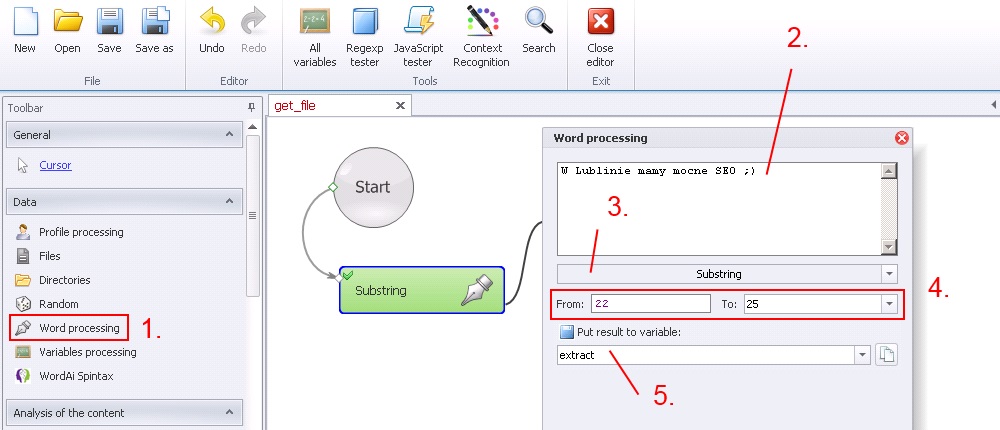
Word processing –> Substring
This function allows to substring from specified string more specified string by digital value.
1. Select ‚Word processing’ from the left menu.
2. Insert data.
3. Select ‚Substring’ from the drop-down menu.
4. Define substring range. ‚From’ – beginning of separation, ‚To’ – end of separation.
I will show you this with an example on string ‚W Lublinie mamy mocne SEO’ values: ‚From’=22, ‚To’=25, substring SEO.
5. Create and save substring to variable.
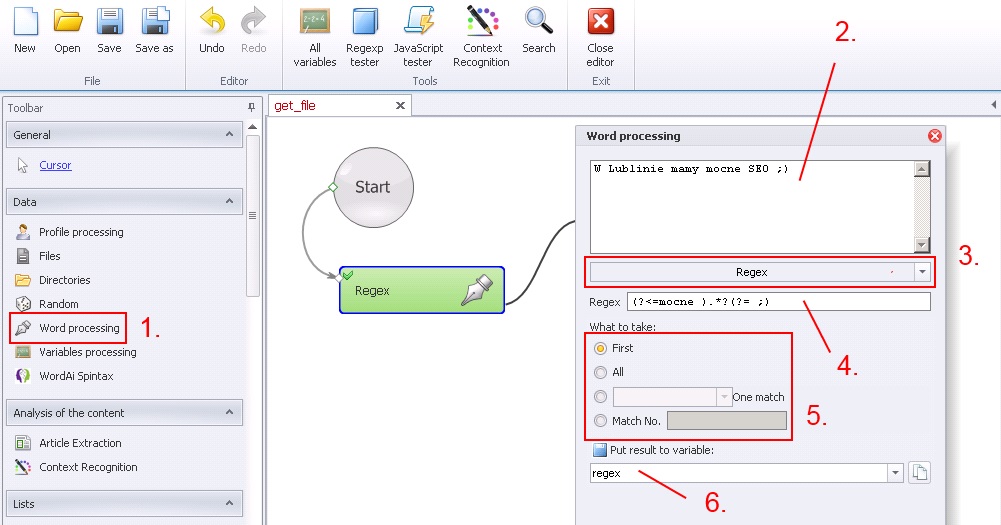
Word processing –> Regex
Regex, is an abbreviation of regular expression. Regular expression cooperated with Zennoposter give you practically unlimited possibilities of data processing. So if using regex is still not easy for you, please visit http://www.regular-expressions.info/. Till you are not ready to use regex alone I think it could be better for you to use Creater in Zennoposter. The name of that is ‚Regexp tester’ in the top menu. Please notice that ‚Regexp tester’ can do multiple matches, but it is not suitable with high expression, so you need to remember it is good on the beginning, but still you need to learn regular expression on your own.

1. Select ‚Word processing’ from the left menu.
2. Insert data.
3. Select ‚RegexSelect’ from the drop-down menu.
4. Insert regular expression.
5. Define match.
— First.
— All.
— One match.
— Match No. – more details here
6. Create and save regex to variable.
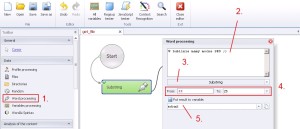
Word processing –> Spintax
Spintax mixed synonymous texts.
1. Select ‚Word processing’ from the left menu.
2. Insert synonymous texts.
3. Select ‚SpintaxSelect’ from the drop-down menu.
4. Create and save generated text to variable.
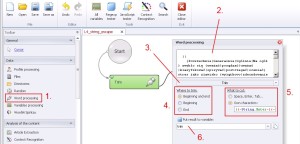
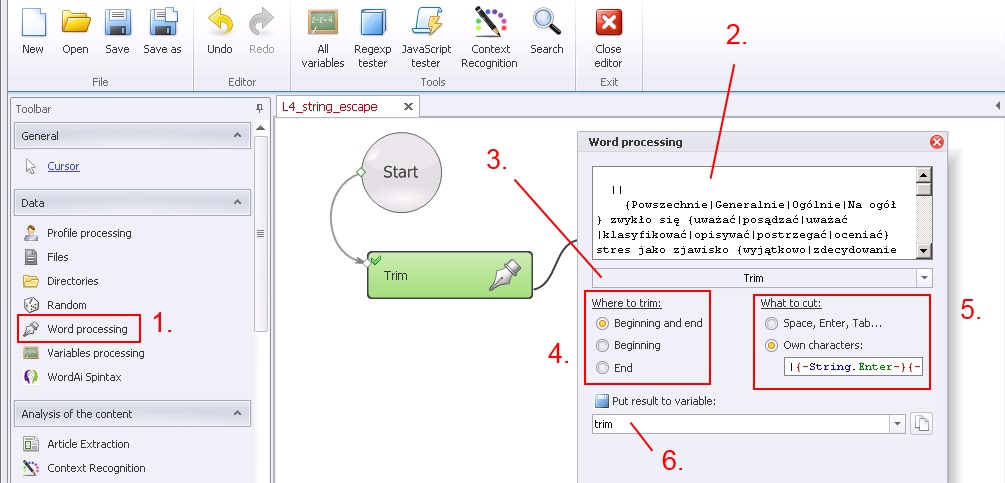
Word processing –> Trim
This function in default settings allows to remove empty rows or space from the text, which are cut from both the beginning and the end of the text. There is also the ability to define characters to trim.
1. Select ‚Word processing’ from the left menu.
2. Insert text.
3. Select ‚Trim’ from the drop-down menu.
4. Where to trim
— Beginning and the end.
— Beginning.
— The end.
5. What to cut.
— Space, Enter, Tab.
— You can also define your own characters.
6. Create and save to variable.
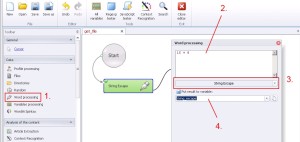
Word processing –> String escape
This function converts the data to automatically usage by regular expressions.
1. Select ‚Word processing’ from the left menu.
2. Insert data.
3. Select ‚String escape’ from the drop-down menu.
4. Create and save to variable.
To make it clear for you I will put an example:
I will explain you this what you have on the screen above. If we have prepered a list of mathematical solutions in the form ’15 + 8 = 23′ (each action on a separate line) after completing ‚String escape’ and later after using ‚Word processing –> Regex’ (in which is this list of mathematical solutions, as a text or as a variable, which loaded this list) regex ‚(?<={-Variable.string_escape-} = ).*’ (without quotation) you will get the result of solution. So if you will have protection ‚question answer’ in mathematical form you will be able to deal with it. Check this out here.

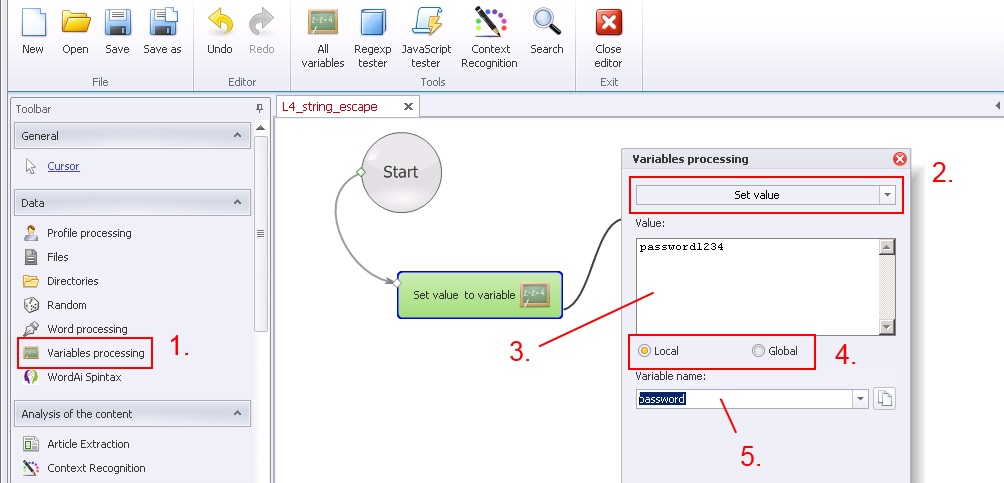
Variables processing –> Set value
Setting value to variable.
1. Select ‚Variables processing’ from the left menu.
2. Select ‚Set value’ from the drop-down menu.
3. Set value.
4. Select saving mode. You can select from ‚Local’ mode or ‚Global’ mode. Global variable can be used by many projects.
5. Create and save to variable.
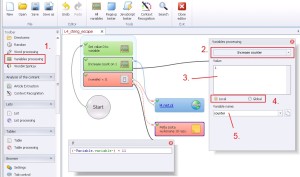
Variables processing –> Increase counter
This function increases the value of the variable expressed numerically. This option is useful for creating a loop and defining the number of repetitions.
1. Select ‚Variables processing’ from the left menu.
2. Select ‚Increase counter’ from the drop-down menu’.
3. Set numerical value.
4. Select saving mode. You can select from ‚Local’ mode or ‚Global’ mode.
5. Save to variable.
Define the number of repetitions by creating the loop you can check out on
this template or on the movie hereunder.

Variables processing –> Decrease counter
This function works exactly like Variable processing –> Increase counter but instead of the upward trend is a downward trend.
1. Select ‚Variables processing’ from the left menu.
2. Select ‚Decrease counter’ from the drop-down menu.
3. Set the numerical value.
4. Select saving mode. You can select from ‚Local’ mode or ‚Global’ mode.
5. Save to variable.
Template with examples you can download
here.


1 Komentarze
Hi, is it work now?